 We live in Arizona and have about 38.37% more UV than anyone else on the planet. Probably.
So we need sunsceens for our windows. We could put those folding silver screens on the inside against the windows and more than likely the UV would be thwarted, but the heat would be trapped inside the RV and eventually would bake everything inside the RV like a cookie that has been baked in an oven at 450 degrees for 2 hours. These shades are pretty cheap ($2.50 for small ones) in Wal-Mart and come in a variety of sizes and thicknesses. Our local RV store, Orangewood RV, sells large sheets, 4' wide, of the metallic material by the foot. About $3.75 per foot.
We could also put a film on the windows but that would not work on the biggest window we got, the windshield.
The best option we could come up after looking around our storage lot at other vehicles with is to put sunscreens on the outside, covering each of the coach's windows. To tell the truth only about 12.32% of the vehicles in our lot have any type of sunscreen other than their privacy curtain. On the 78.68% of the others you can almost hear the curtains rotting in the sun. We found custom made sunscreens for just about every kind of coach in several different places on the web. All of them are expensive.
I saw a post by sigthor (Bob Will) on RV.net about his D-Y-I sunscreen project and became convinced since Seven knows how to use a sewing machine (a vast understatement) that we could D-Y-I some ourselves. The key ingredient, the UV resistant fabric, sigthor told us could be bought at Home Depot. We found a 6'x12' piece precut peice there for around $18. They sell it precut and by the yard in 4 differenet colors. We bought a precut piece and found 3/8" snaps at Joann's Fabrics that would work. They were $4.50+tax for 7 of them and we had to buy a special tool to use on them for another $2.50.
 We held off on getting those because we were not sure of the size of the snaps already on our coach. After we found out that our snaps were 3/8" we went to Campers World and found that they had some snaps that included the tool for $4.50 (Lord and Hodge #1100 and #1110 (with screw studs). There were only six snaps in their packages however. We bought a couple of packages and today took them out to the lot and started making our front windshield sunscreen. CW had two different packages: one with screws and one without. These snaps can be ordered from Amazon and other places. They also sell refill packages (#1110A and #1100A) for these that do not include the tool. CW only had the ones with the tool.
I will tell you the proper way to make a sunscreen since we did make a boo-boo on ours that is almost inconsequential but is wrong nevertheless.
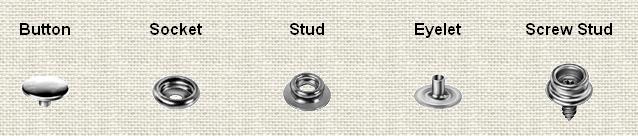
- Preparation: Drill the 1/8" holes per the instructions on screw-in snaps package (#1110) into your RV (check to see if you will hit wood because the laminate is probably not thick enough to hold the sheet metal screw which is around 1/2"-5/8" long) and screw the male snap part into the holes. There are 4 parts to each snap - the female and male parts consists of two pieces (if you use the screw studs, there is only one piece for the male part). I will use 4 snaps for each of my side coach windows, 5 for the driver and passenger side windows, and 10 for the front windshield (5 on top, 2 side ones, and 3 on the bottom). I will drill, screw and make sunscreens for one window at a time.
- Making the sunscreen: Do not sew the fabric at first - the fabric stretches and the windshield is not a perfect rectangle so if you try to do it all in one step there is a very good possibility you will mess it up no matter how careful you are. We did slightly. This is probably the best way to do it:
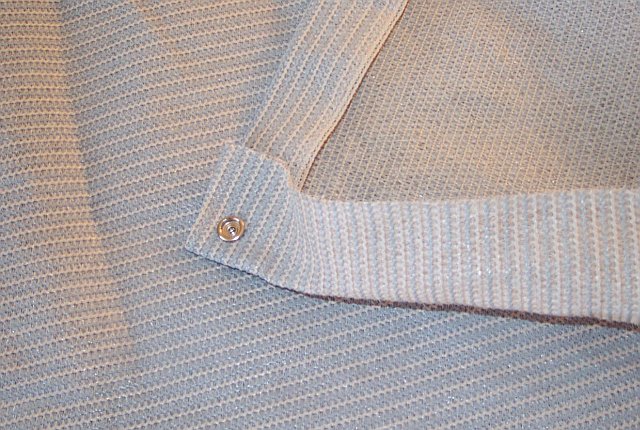
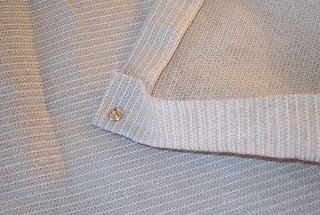 Fold over one corner - horizontaly and vertically. A 2" hem is good for side windows. Use a 4" hem on the top of the windshield and on the sides and 2" on the bottom. Leave the fabric uncut until after you have the snaps in place in the fabric. Cut away some of the fabric in one of the 4 folded layers so that you are only inserting a snap post into 3 pieces of fabric. We cut a small circle in one layer of fabric where the snap was going to come through. Use a sharp object and poke a hole through the fabric about 1/2" - 3/4" away from the folded edge of the seam. Insert the button part of the snap through the hole. Put on the female part of the snap (the button and socket) over the button's post then use the tool to pound the post on the button so it connects the two parts together with the fabric in between them.
 - Snap the female snap you just created on the RV then stretch the fabric to next horizontal male snap - on a side window that will be just the other horizontal male snap. Mark the next snap's location with a safety pin or marker. Do not pull it too tight. Make sure that you have decent 4" hem for the top of windshield sunscreen. On the windshield sunscreen, snap the first snap in place on the top of the windshield then stretch the fabric all the way across to the male snap on the far side of the windshield. Make sure that you will have enough fabric in your hem to cover the middle and two intermediate snaps on the top of the windshield area because they may be higher than the two on the side. Ours were. Install the female snap. Snap the sunscreen into place using the two snaps you just made, then mark the location of the middle snap, install it and snap the suncreen into place. Mark the two intermediate snaps and, install them then snap the screen back into place. Do the same for the two side snaps and the bottom snaps. This takes two people and some ups and downs on the ladder.
- Take it slow and easy and do it one step at a time. We tried measuring it and laying it out but when we tested it against the snaps that were in place before installing female snaps, nothing matched up for some reason. It is not a difficult job except if your windshield is, as the guy in the driveway says about Steve Buscemi in my favorite movie- Fargo, kind of funny looking - or curved. Ours was.
- Once all the snaps are installed in the fabric, sew the hem with two rows of stitching - one close (1/2") to the outside edge and one close (1/2") to the inside.
The project will probably cost a bit over $85 by the time we are finished with it and it won't look half bad. Sigthor said his cost around $100. Custom made ones sell for over $200. We have have spent 2 hours not counting shopping and investigating on the project so far. Will spend probably another 3-4 hours on it. As my bro-in-law Mike says "We have the time. We are retired." We already had 20 male snaps in place on our RV so that saved us from buying 3-4 packs of the screw-in snap assemblies (#1100A). Seven is talking about embroidering our names in the windshield screen to make it even more fancy. Pictures to follow.


No comments:
Post a Comment